

Overview
Understanding LOD
LOD stands for Level Of Detail - a system used to represent distant objects with simplified meshes and textures to improve performance. In Bethesda games, LOD primarily refers to Cell LOD, which represents whole "chunks" of land in the distance.
Cell LOD is divided into three main categories:
- Object LOD - Simplified versions of buildings, rocks, and other static objects. Has only one quality level and generates relatively quickly.
- Terrain LOD - Represents the terrain of cell groups, with multiple quality levels that change based on distance (LOD4 4x4, LOD8 8x8, etc.). Takes the longest to generate due to its complexity.
- Tree LOD - 2D planes representing vegetation.
Why Generate Custom LOD?
The vanilla game's LOD is pre-generated and static, which means it can't reflect changes made by mods to terrain or objects. Custom LOD generation creates meshes that match your modded game, providing:
- Increased visual consistency between nearby and distant objects.
- More objects visible in the distance.
- LOD textures that match your installed texture mods.
- Improved quality over the low-detail vanilla LOD.
- Filled gaps where objects previously appeared out of nowhere during cell transitions.
DBF (even with DBF Extended) does not strictly require terrain LOD regeneration, but this guide covers both object and terrain LOD to accommodate custom modlists.
While custom LOD significantly improves visual quality, it does come with a minor performance cost. The trade-off is generally worth it for most modern systems.
LOD Comparison
Drag the slider handle to compare how the game looks with generated LOD. Use the dropdown to select different comparison sets. You can also find performance and VRAM usage comparisons here.
Preparation
Creating a Separator in MO2
- Right-click the empty space in the left pane of MO2 and select Create separator.
- Name the separator LOD.
Installing LOD Resources
Install in the following order:
-
A Clear Map of Skyrim and Other Worlds
- Main Files - A Clear Map of Skyrim and Other Worlds FOMOD
- You will be prompted with a FOMOD installer:
- DynDOLOD 3
- With DynDOLOD LOD32
- Remove or keep clouds based on your preference
- Install
After installing ACMoS, you should move its plugin right above Weather of World.esp. This way, Weather of the World will overwrite ACMoS and the map will look better.
-
DynDOLOD Resources SE 3
- Main Files - DynDOLOD Resources SE 3.00
- You will be prompted with a FOMOD installer:
- Next
- Solitude Occlusion Planes
- High Hrothgar Windows Glow
- DLC2 Vvardenfell 3D Plume
- Desync Birds of Prey
- Install
-
DynDOLOD DLL NG
- Main Files - 1 - DynDOLOD DLL NG and Scripts 3.00
-
Far Object LOD Improvement Project SSE
- Main Files - Far Object LOD Improvement Project SSE
-
Majestic Landscapes
- Update Files - Noise DDS
-
A Dragonborn's Fate Resources
- Main Files - DBF LOD Guide - Whiter Snow LOD Material
IMPORTANT:
Enable all resources in MO2 before continuing.
Cleaning Plugins
In order to prevent the bug where LOD fails to unload (shown in this video) DynDOLOD's large refs bugs workarounds are needed, which in turn require cleaning any plugin containing deleted references - in DBF, that only includes the base game and DLC plugins, but in a custom list there may be more.
Cleaning plugins may be a controversial topic, so here's some things to know:
- It is not a requirement for anything else aside from DynDOLOD's large refs bugs workarounds.
- Nothing manual needs to be done in xEdit after QAC has finished, USSEP covers those changes.
- If you've heard about QAC breaking the game, know that the bug was fixed years ago, as documented here.
- Cleaning ESM plugins may result in slightly longer loading times, as xEdit removes the OFST data (an engine optimization for faster cell lookup) instead of regenerating it. However, with a small load order list like DBF, the impact is negligible. Naturally this isn't a good thing, but fixing the large refs bugs is far more important.
You can clean master files directly in the game's Data folder, or load cleaned copies as a mod in Mod Organizer 2. The former takes less storage space (around 200MB). The latter makes your setup more portable.
Directly in the Data folder
As a mod in MO2
Pre-Generated LOD
If you use a DBFE modlist with no changes to textures or the game world, you can skip manual LOD generation by using these files. The Object LOD file also includes Tree LOD, while the other only contains Terrain LOD to reduce bandwith required for upload and download.Simply install both the Object and Terrain Pre-Generated LOD as normal mods in MO2 and put them under the resources listed in the previous section (which you still need), then set up the load order as follows:
- DynDOLOD.esm should be the last ESM plugin (written in bold).
- DynDOLOD.esp and then Occlusion.esp should be at the bottom.
Terrain LOD
xLODGen
xLODGen is an xEdit-based tool that allows you to generate LOD meshes for your game. Similarly to xEdit, it has a single executable that can be be turned into a game specific version by adding arguments.
Generating Terrain LOD is very CPU intensive and can take a long time depending on the settings and your CPU's multithreaded performance.
It's needed only if you have mods that edit the landscape or landscape textures. But the visual improvement is big regardless.
- Download, install, and enable SSE Terrain Tamriel Extend, then place its plugin at the top of your load order (right below _ResourcePack.esl).
It is recommended to lock this plugin's load order (right-click on it) in the correct position, so that it always stays at the top of your load order for future xLODGen runs.
- Download, install, and enable DBF LOD Guide - Temp Snow Replacement.
- Download the latest xLODGen from here.
- Once the download has finished, extract the contents of the archive anywhere outside of the default Windows folders.
- In MO2, select the
 button at the top of MO2 to open the executables menu.
 - Click the + at the top of the window and the select Add from file...
- From the pop-up, navigate to where xLODGen is installed and select xLODGenx64.exe.
- In the Arguments box in the right pane, enter -SSE -O:"C:\Output"
- Close the Modify Executables menu and run xLODGen from the drop-down.
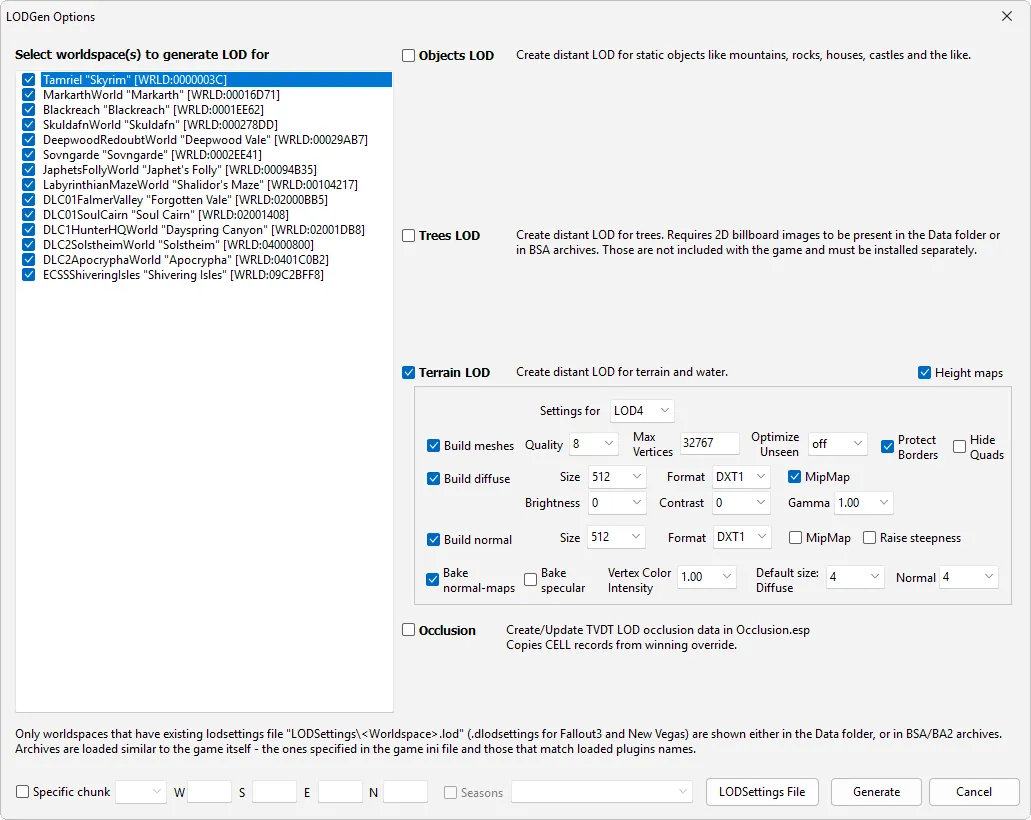
- In the right pane, check only Terrain LOD.
- Copy all settings from the image below:
- Then click Settings for to select the next LOD level (LOD 8), and copy these settings for each of them:
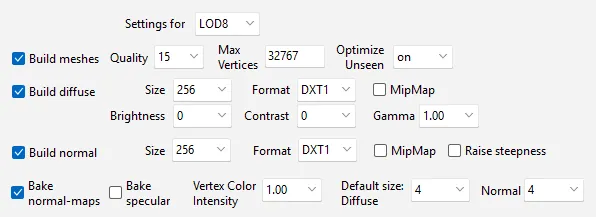
- LOD 8:
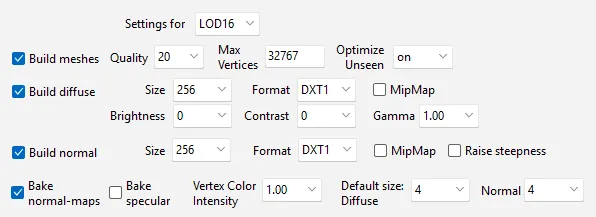
- LOD 16:
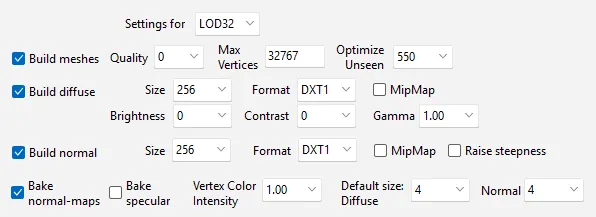
- LOD 32:
- Click Generate.
- When complete, the log will stop and at the end you will see a message saying "LOD generation done", you can now close the program.
- Disable xLODGen Resource - SSE Terrain Tamriel and DBF LOD Guide - Temp Snow Replacement in Mod Organizer 2.
This argument will send the LOD output to a folder called Output on your C drive (the drive Windows is installed on).
You can change this path if you would prefer the files to be generated elsewhere (do not use a UAC protected folder or the game folder).
Make sure that the output folder is empty before generating LOD.
Object and Tree LOD will be done with DynDOLOD, xLODGen is only used for Terrain LOD.
Technical Details
![]()
All LOD levels are generated at once! You don't have to do anything besides configuring every level!
This is not something that you pick and choose - those are not quality "settings", just how the game works.
Installing the LOD
- In MO2, click the tiny wrench icon at the top, next to the mod counter, then click Create empty mod.
- Title the mod Terrain LOD
- Navigate to where the LOD files were generated and select both the textures and meshes folders.
- Cut them to the Terrain LOD mod you just created (right-click on the mod and select Open in Explorer).
- Press F5 while you are on MO2 without any menu open, then make sure the new mod is enabled by ticking its checkbox.
IMPORTANT:
Do not disable the remaining LOD resources! The game needs them for the LOD to work properly.
Generated LOD must always be loaded last in your modlist!
If it happens to be overwritten by any mod, the LOD in-game will be broken.
Generating Paths
- Download ACMOS Road Generator
- Once the download has finished, extract the contents of the archive.
- Run ACMOS Road Generator.exe.
- In Mod Organizer 2, right-click on your Terrain LOD mod and select Open in Explorer.
- From from newly opened window, copy the file path.
- Click Browse... next to Path to LOD, then paste the path you just copied.
- Click the Generate button.
- Click Yes at the Overwrite LOD textures prompt.
- Once the process is complete, click No at the Zip? prompt.
- When complete, you should get an All Done prompt, press OK and close the program.
Splitting Heightmaps
The Terrain Shadows mod cannot read files inside BSA, which is the next step. To work around this, we will move the heightmaps out of the mod folder temporarily, pack the LOD, then move them back.
- Download the Move Heightmaps Script and unpack it.
- In Mod Organizer 2, right-click on your Terrain LOD mod and select Open in Explorer.
- Copy the Move Heightmaps Script.bat file to the Terrain LOD mod in MO2.
- Run the script - a new folder should appear with the name heightmaps, we will use this after packing.
Packing Terrain LOD
This step is not necessary, but will reduce loading time of LOD assets by the game by packing them into optimized archive files (BSAs). This translates to less stuttering when entering new areas.
- Download Cathedral Assets Optimizer.
- Once the download has finished, extract the contents of the archive.
- Run Cathedral_Assets_Optimizer.exe.
- Tick the Create BSA box.
- In Mod Organizer 2, right-click on your Terrain LOD mod and select Open in Explorer.
- From from newly opened window, copy the file path, then paste it into CAO (right below the profile drop-down).
- Click the Run button.
- Once the process is complete, you will see a message saying "Done" at the bottom.
- If everything was done correctly, the Terrain LOD folder should have BSA files and the relative plugin for loading them.
- Click F5 while you are on MO2 without any menu open, and make sure the aforemention plugin is enabled in your load order.
BSA Usage Information
![]()
Moving Back Heightmaps
Now that the LOD is packed, we can move the heightmaps back to the mod folder so that the Terrain Shadows mod can actually read them.
- In Mod Organizer 2, right-click on your Terrain LOD mod and select Open in Explorer.
- Open the heightmaps folder that was created by the script.
- Cut the textures folder back to the Terrain LOD mod, next to the BSAs and plugin(s).
- Delete the heightmaps folder and the Move Heightmaps Script.bat file from the mod.
- Press F5 while you are on MO2 without any menu open, then make sure the mod is still enabled by ticking its checkbox.
Object and Tree LOD
TexGen
- Download the latest DynDOLOD 3 Alpha.
- Once the download has finished, extract the contents of the archive to any location of your choice (do not use a UAC protected folder or the game folder).
- In MO2, select the button at the top of MO2 to open the executables menu.
- Click the + at the top of the window and the select Add from file...
- From the pop-up, navigate to where TexGen is installed and select TexGenx64.exe.
- In the Arguments box in the right pane, enter -SSE
- Close the Modify Executables menu and run TexGen from the drop-down.
- Enable HD Tree.
HD Tree billboards are a pre-requirement for trees in Object LOD - this achieves better visuals and works around limitations of the Tree LOD system. More information can be found in the DynDOLOD 3 wiki.
- Click Start.
- When complete, you will see a message saying "TexGen completed successfully", click Zip and Exit.
- Install the TexGen output by clicking the
 button at the top of MO2.
 - From the new window, navigate to the DynDOLOD folder you installed in step 2, then double-click TexGen_Output.zip and install it.
DynDOLOD
- In MO2, select the button at the top of MO2 to open the executables menu.
- Click the + at the top of the window and the select Add from file...
- From the pop-up, navigate to where TexGen is installed and select DynDOLODx64.exe.
- In the Arguments box in the right pane, enter -SSE
- Close the Modify Executables menu and run DynDOLOD from the drop-down.
- Once DynDOLOD has loaded, open the Advanced settings and copy the following:
Aside from the few tweaks to LOD32 settings needed by ACMoS to look as intended, the other settings are largely up to personal preference and performance target. More information about what each setting does can be found in the DynDOLOD 3 wiki. The ones used by DBF are on the higher end of visuals, but still reasonable for most systems. As mentioned earlier, you can find performance and VRAM usage comparisons here.
- In the top-left corner, right-click the list of worldspaces and Select all.
- Select the High preset.
- Enable Candles and FXGlow.
- In the Mesh and Reference rules list, scroll to the bottom and double-click on tree.
- Set its LOD options to:
- LOD4: Level0
- LOD8: Billboard4
- LOD16: Billboard4
- LOD32: Billboard6
- Still in the list, double-click \ and set its LOD32 to Level0.
- Copy these options:
- Click OK.
- When complete, you will see a message saying "DynDOLOD completed successfully", click Zip and Exit.
- Install the DynDOLOD output by clicking the button at the top of MO2.
- From the new window, navigate to the DynDOLOD folder you installed in step 2, then double-click DynDOLOD_Output.zip and install it.
- Set up the load order as follows:
- DynDOLOD.esm should be the last ESM plugin (written in bold).
- DynDOLOD.esp and then Occlusion.esp should be at the bottom.
