

Mod Organizer 2
What is Mod Organizer 2?
Mod Organizer 2 (MO2) is an open source game mod manager, mainly used for Bethesda games. Its main features are:
-
Virtual Filesystem (USVFS): MO2 does not install mods directly into the game's folder, but rather creates a virtual filesystem that the game reads from. This allows for:
- Safe mod installation and uninstallation,
- Being able to modify mod install order at any point,
- Having multiple profiles with different mod setups,
- Keeping original game files clean.
- Mods installed through MO2 are "visible" only to programs launched using MO2,
- Some programs may not work properly with MO2's virtual filesystem,
- USVFS can cause performance overhead if you have tons of loose (not-BSA/BA2) files,
- USVFS works by "hooking" into the game (similarly to mods such as SKSE plugins, ReShade, etc.). This method can be considered as unsafe by some antivirus software due to its memory-invasive nature.
- Profile System: MO2 allows you to create multiple profiles with different mod setups, saves, and settings.
- Two pane interface: MO2 is split into two sides, the left side is the modlist and the right side is the plugin list. This allows for easy conflict resolution and mod management.
- Portability: Thanks to the use of USVFS, MO2 has a "portable" mode that allows you to move the entire MO2 folder to another location with minimal setup.
-
Modding Community Integration: MO2 has built-in support for Nexus Mods, allowing you to download mods directly from the Nexus.
It also has a plugin system that allows for creation of custom plugins to extend its functionality.Mod Organizer 2 has NO support for Nexus' Collections feature, so you will have to download mods one by one.
This is not a big issue, as the guide will provide direct links to the mods you need, and most collections are low quality and not curated.
The closest alternative to Collections is Wabbajack, which is a community-made modlist installer that can install entire modlists with a single click. Due to its higher bar of entry for modlist creators, Wabbajack lists tend to be of higher quality compared to Collections.
You can find all instructions on how to install the official A Dragonborn's Fate Wabbajack list here.
Why Mod Organizer 2?
Mod Organizer 2 has been chosen for our guides due to its ease of use and its ability to keep the game's folder clean. This is important because it allows for easy conflict resolution and mod management, and makes correcting mistakes trivial - installed mods in the wrong order? Just drag them into the correct position!
Compared to Vortex, MO2 doesn't hide the most important parts of modding from the user, making it easier to understand what is happening and why, albeit at the cost of potentially looking scary at first.
That said, we are well aware that MO2 is not perfect, and it has its own set of issues and limitations, but it is the best tool for the job.
Installation
Installing Mod Organizer 2
- Download Mod Organizer 2 from here.
- Once the download has finished, run the installer.
- Accept the license, click Next.
-
When asked about the install location, change MO2 to A Dragonborn's Fate and click Next.
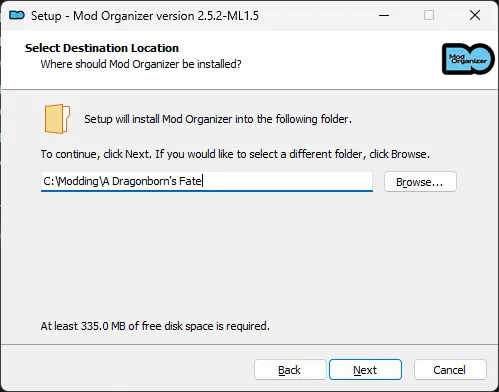
If you wish to install Mod Organizer 2 in a different location, you can do so by clicking the Browse button and selecting a different folder.
The folder MUST be outside of the default Windows folders (such as Program Files x86) and outside of the game's Root folder.
It's discouraged to store MO2 on Desktop or Documents if you use OneDrive or similar cloud providers, due to potential issues and degraded performance. - On the install components page, use defaults.
-
When asked about the Start Menu folder, change Mod Organizer to A Dragonborn's Fate and click Next.
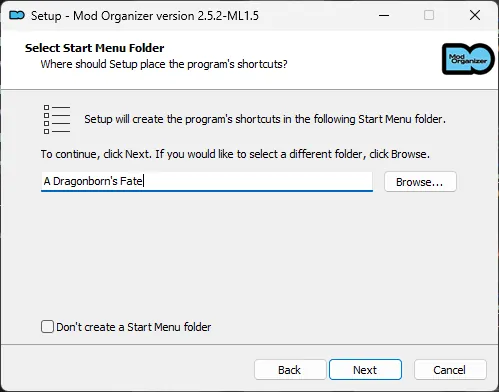
- Don't create a Desktop shortcut - we will create our own later.
- On the final page, click Install.
- Once the installation is complete, ensure that Launch Mod Organizer is ticked and click Finish.
MO2 refuses to open? Try these steps in the FAQ.
Setup
Configuring Mod Organizer 2
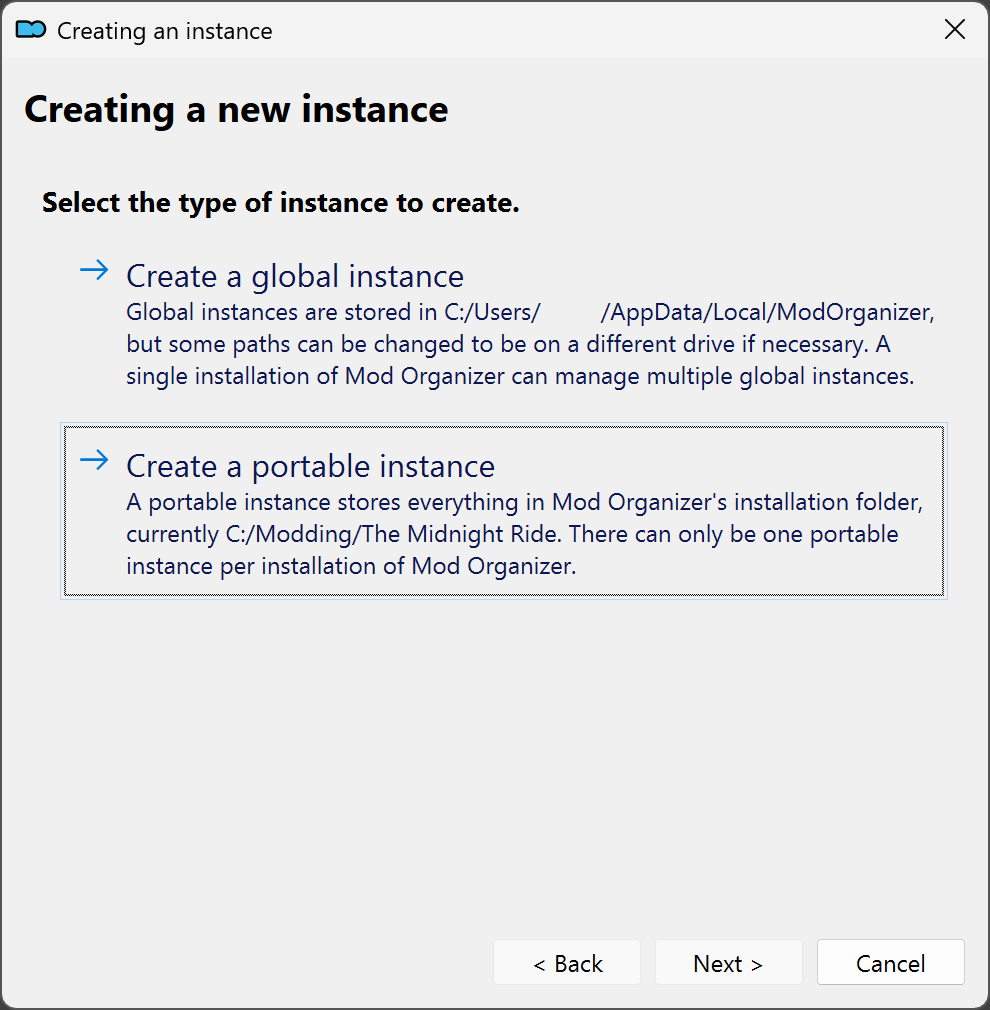
- On the instance creation page, select Create a portable instance, click Next.
- Select Skyrim Special Edition and click Next.
- Select the store where you bought the game, click Next.
- When asked about profile settings, enable all options and click Next.
- Keep the default location file path.
- On the next page, click Connect to Nexus.
- MO2 will open your browser and prompt you to authorize the connection.
- Once you authorize it, you can close the browser page and click Next in MO2.
If you have MO2 installed on an SSD or a HDD with little space, you can check the Show advanced options box and change the Downloads file path to a different drive with more space.
This will not affect the game's performance, the downloaded files can be deleted after the mods have been installed.
- On the last page, select Finish.
- If you see a pop-up called Show tutorial?, select No.
- If you see a pop-up called Register?, select Yes.
- If you see a pop-up called INI file is read-only, select Remember my choice from the drop-down at the bottom then click Clear the read-only flag.
Game Settings
In this step, we will download and run Bethini Pie, which will allow choosing optimized presets and more specific options all through an easy to use interface.
- Download Bethini Pie.
- Extract the archive anywhere outside of the default Windows folders, such as C:\Modding Tools.
- In MO2, click on the drop-down in the right pane next to the Run button.
- Click <Edit...>, then click the + symbol in the top left and Add from file.
- In the resulting explorer window, navigate to where you installed Bethini Pie and select Bethini.exe.
- Press Apply in the lower right, then OK.
- Select Bethini from the drop-down and run it.
- Click Skyrim Special Edition then press Select Game.
- If you get a Setup prompt press OK. You don't need to redirect the INI path to MO2's profile folder because MO2's VFS already handles the redirection.
GOG users will need to correct the paths, as they default to Steam ones.
- Apply the following settings:
- Select a Bethini preset depending on your hardware. The High preset is recommended for most systems.
- Apply Recommended Tweaks.
- Set Display Mode to Borderless Windowed.
- Select the resolution you want to display the game in.
- Make sure Text Language is set to English both in Bethini Pie and on Steam (other languages are not supported by the guide).
- Enable Freebies Seen.
- Edit the other settings to your liking.
- Click File then Save in the top left, then confirm the prompts and close Bethini.
Freebies Seen is the the setting that gets set to 1 by the game after you go through the AE DLC's prompts for download. The guide doesn't support this DLC, so we set it to 1 manually to prevent that prompt.
Alternatively, you can just back out of the login screen and it will be set to 1 automatically.
Mod Installation Instructions
How to use Nexus and MO2?
When the guide says to install a mod, it will be formatted as Main File - Example 1.5, this is referring to the mod's category on Nexus and file name.
IMPORTANT:
Unless otherwise specified, you will always use Mod Manager Download.
Standard procedure through the manager:
- Download the indicated file(s).
- Open the Downloads tab in MO2 (below the executable selector on the right).
- Double-click on the mod to install it.
- Enable the mod on the left pane by ticking its checkbox.
If downloading through the manager is not an option, do the following:
- Click the Manual Download button (or whatever the download button is for the respective site).
- Once the download has finished, click the
 button at the top of MO2.
 - From the new window, navigate to where the file was downloaded to and double-click it.
- Finish the install as you would with a Mod Manager Download mod.
When installing a mod, MO2 might prompt you with multiple choices:
- Rename appears when you are trying to install a file with the same name as an existing one. If you are installing, for example, a secondary file necessary for the mod to work, then rename it accordingly with the name drop-down list or by typing the name manually.
- If you are updating from an old version of a mod, you should select Replace, this will automatically delete all the files from the old version of the mod and replace them with the ones from the new version.
- Merge should only be used when you are sure the mod will not be updated and in situations where a hotfix is uploaded as separate file. Avoid it if you can, for maximum modularity.